This section provides a detailed walkthrough of importing demo content using Yomooh’s built-in demo importer. The process allows you to replicate our professionally designed demo sites with just a few clicks.
Before You Begin: Essential Preparations
-
Complete Theme Installation
-
Ensure Yomooh theme is properly installed and activated
-
Verify Yomooh Core Plugin is installed (required for demo import)
-
-
System Requirements Check
-
PHP memory limit: Minimum 256MB (512MB recommended)
-
Max execution time: At least 300 seconds
-
WordPress file permissions properly set
-
-
Backup Your Site
-
Use plugins like UpdraftPlus or your hosting backup tools
-
Particularly important if you have existing content
-
Accessing the Demo Importer
-
Navigate to: Yomooh Theme > Theme Demo in your WordPress dashboard
-
You’ll see a grid layout of available demo sites including:
-
Corporate Business
-
Creative Agency
-
Modern Blog
-
eCommerce Shop
-
Portfolio Showcase
-
Demo Preview Feature
-
Click the “Preview” button on any demo to:
-
View the demo in a lightbox
-
Examine layout options
-
Check color schemes
-
Review page templates
-
-
Preview helps you:
-
Select the most suitable demo
-
Understand what content will be imported
-
Plan your customization strategy
-
Comprehensive Import Process
Step 1: Initiate Import
-
Click “Import” on your chosen demo
-
The system will display an import configuration panel with:
Step 2: Import Options Selection
You’ll see three main import sections:
-
Content Options
-
☑ demo contents > for Posts and pages menu.
-
☑ customizer > for Customizer settings.
-
☑ Options > for theme settings.
- ☑ Widgets > for widgets like sidebar footer columns.
-
-
Plugin Recommendations
-
Required plugins
-
Recommended plugins
-

Step 3: Execution Phase
-
Click “Import Now” button
-
The system will:
-
First install required plugins if missing
-
Then download demo content files
-
Process content in stages (visible progress bar)
-
Apply theme settings last
-
📌 Important Notes During Import:
-
Do not close the browser tab
-
Avoid navigating away from the page
-
Some hosting may take 5-10 minutes (complex demos)

Post-Import Procedures
1. Final Configuration
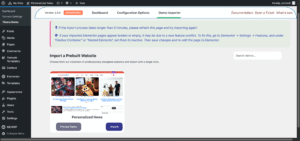
📌 Note: If your imported Elementor pages appear broken or empty, it may be due to a new feature conflict. To fix this, go to Elementor → Settings → Features, and under “Flexbox Container” or “Nested Elements”, set them to Inactive. Then save changes and re-edit the page in Elementor.
After successful import:
-
Homepage Setup
-
Go to Settings > Reading
-
Set “Your homepage displays” to static page
-
Select the imported homepage
-
-
Menu Assignment
-
Navigate to Appearance > Menus
-
Assign the imported menu to proper locations
-
-
Permalinks Refresh
-
Go to Settings > Permalinks
-
Simply click “Save Changes”
-
2. Recommended Checks
-
Verify all pages imported correctly
-
Check media files for proper display
-
Test contact forms functionality
-
Review slider configurations
Troubleshooting Common Import Issues
📌 Note: If your imported Elementor pages appear broken or empty, it may be due to a new feature conflict. To fix this, go to Elementor → Settings → Features, and under “Flexbox Container” or “Nested Elements”, set them to Inactive. Then save changes and re-edit the page in Elementor.
❌ Import Stuck at Certain Percentage
-
Solution: Refresh page and restart import
-
Increase PHP limits if persistent
❌ Missing Images After Import
-
Solution: Use “Regenerate Thumbnails” plugin
-
Check media library permissions
❌ Plugin Installation Failures
-
Solution: Manually install problematic plugins
-
Verify plugin compatibility
❌ White Screen During Import
-
Solution: Increase PHP memory to 512MB
-
Disable caching plugins temporarily
Customizing After Import
-
Content Modifications
-
Edit pages via Elementor or default editor
-
Replace placeholder content with your own
-
-
Design Tweaks
-
Access Yomooh Customizer for colors/fonts
-
Adjust layouts via theme options
-
-
Adding New Elements
-
Create additional pages as needed
-
Extend with WooCommerce if applicable
-
📌 Pro Tip: Make all customizations in a child theme to preserve changes during updates.
Final Notes
-
Performance Considerations
-
Optimize images after import
-
Consider caching solutions
-
-
Backup After Successful Import
-
Create a fresh backup of your configured site
-
-
Support Resources
-
Dedicated support for import issues
-
For additional help, contact our support team at support@somnest.net with:
-
Your hosting environment details
-
Screenshots of any errors
-
Steps you’ve already tried